MySQL JDBC 驱动支持使用 addBatch 和 executeBatch 方法,进行批量写入操作。MySQL 提供了 allowMultiQueries 和 rewriteBatchedStatements 两个属性用于控制是否开启批量写入,如果用户在 JDBC URL 上开启 &allowMultiQueries=true&rewriteBatchedStatements=true 属性,那么 MySQL 驱动会将多条 INSERT 语句改写成多组 VALUES,将 DELETE 和 UPDATE 语句改写成 ; 分隔的多语句。如果用户不配置 allowMultiQueries 和 rewriteBatchedStatements 属性,MySQL 驱动则会以单条 SQL 方式逐一请求。
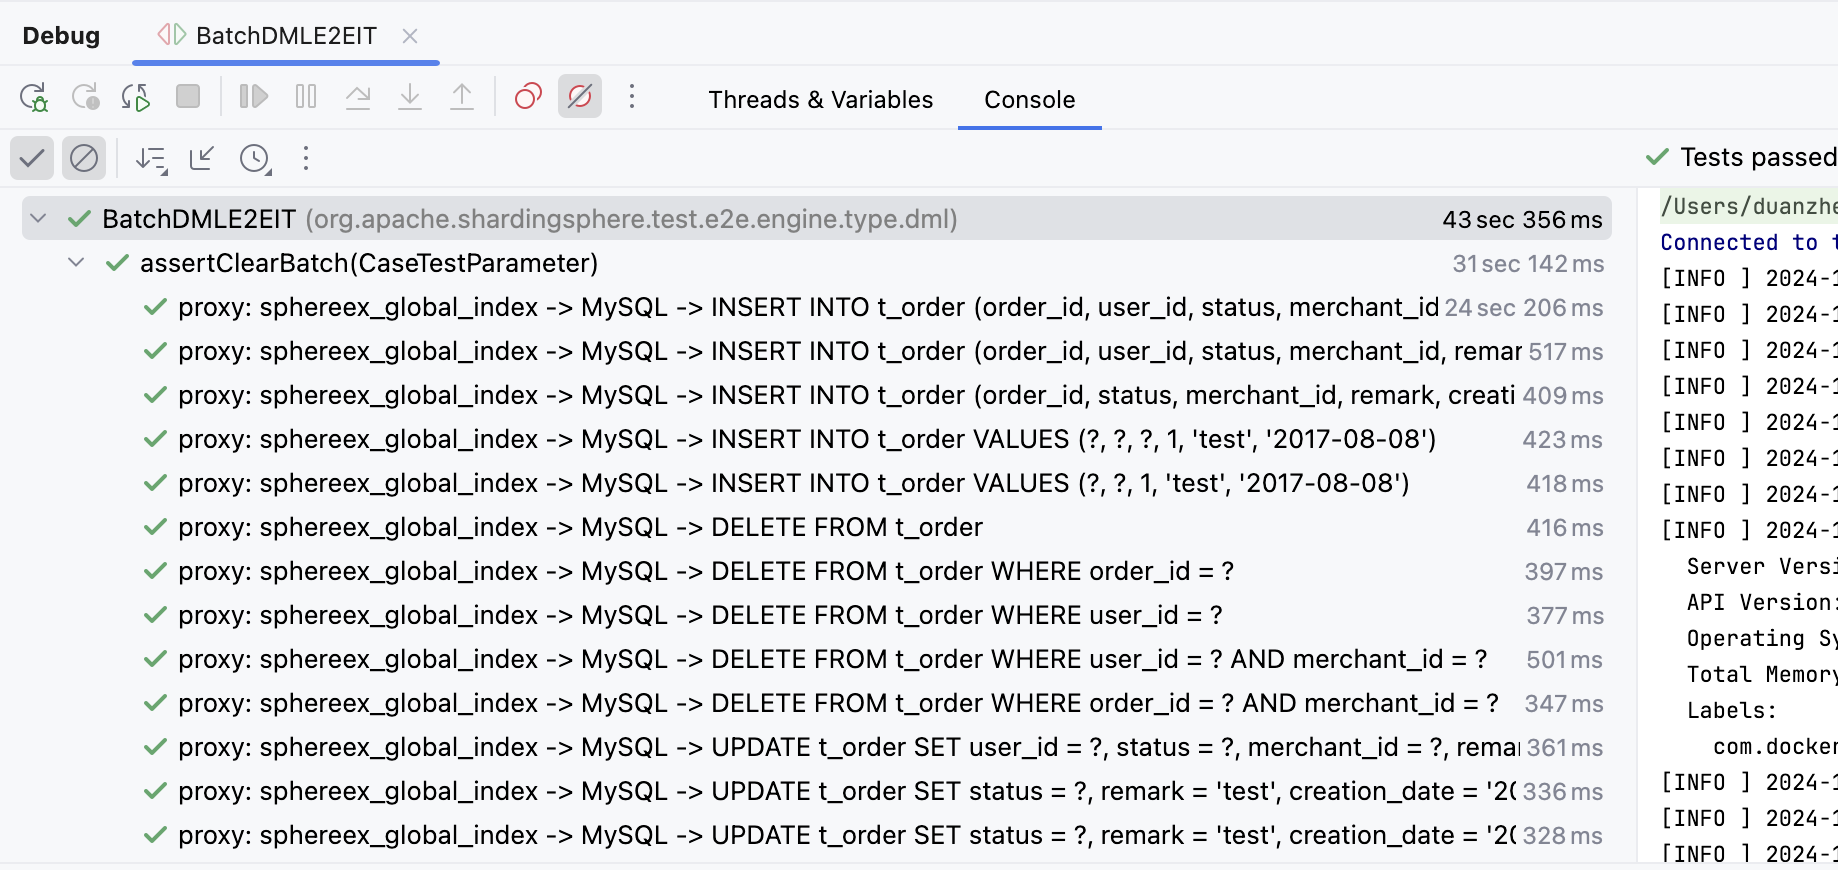
ShardingSphere Proxy 实现了完整的 MySQL 协议,因此对 MySQL 批量写入也进行了兼容,但是笔者在开发 DBPlusEngine 全局索引功能时,发现新增的批量写入 Case 断言报错(如下图),executeBatch 返回的 int[] 不正确,需要进一步分析和适配。
首先,由于 E2E 程序不方便调试,我们编写一个最小化 Demo 复现这个异常,如下是最小化 Demo 的源码,使用了 PreparedStatement 方式创建预编译 SQL,然后再通过 addBatch() 添加多组参数,此处需要注意,只有当 batchCount > 3 时,MySQL 驱动才会将 SQL 改写为批量 SQL。
1
2
3
4
5
6
7
8
9
10
11
12
13
14
15
16
17
18
19
20
21
22
23
24
25
26
27
28
29
30
31
32
33
34
35
@Test void assertGlobalIndex () throws SQLException { try ( Connection connection = DriverManager.getConnection("jdbc:mysql://127.0.0.1:3307/sphereex_global_index?useSSL=false&useServerPrepStmts=true&useLocalSessionState=true&characterEncoding=utf-8&allowMultiQueries=true&rewriteBatchedStatements=true" , "root" , "root" ); PreparedStatement preparedStatement = connection.prepareStatement("DELETE FROM t_order WHERE order_id = ?" )) { connection.setAutoCommit(false ); preparedStatement.setObject(1 , 1001 ); preparedStatement.addBatch(); preparedStatement.setObject(1 , 1101 ); preparedStatement.addBatch(); preparedStatement.setObject(1 , 999 ); preparedStatement.addBatch(); preparedStatement.setObject(1 , 998 ); preparedStatement.addBatch(); final int [] ints = preparedStatement.executeBatch(); System.out.println(ints); preparedStatement.clearBatch(); preparedStatement.setObject(1 , 1000 ); preparedStatement.addBatch(); preparedStatement.setObject(1 , 1100 ); preparedStatement.addBatch(); preparedStatement.setObject(1 , 999 ); preparedStatement.addBatch(); preparedStatement.setObject(1 , 998 ); preparedStatement.addBatch(); final int [] ints2 = preparedStatement.executeBatch(); System.out.println(ints2); preparedStatement.clearBatch(); connection.rollback(); } }
Demo 中我们连接的是 3307 端口,该端口指向的是 Proxy 服务,我们需要将如下的配置添加到 Proxy 配置文件中(如下展示的全局索引配置为 ShardingSphere 商业版功能,开源版本需要删除全局索引配置 ):
1
2
3
4
5
6
7
8
9
10
11
12
13
14
15
16
17
18
19
20
21
22
23
24
25
26
27
28
29
30
31
32
33
34
35
36
37
38
39
40
41
42
43
44
45
46
47
48
49
50
51
52
53
54
55
56
57
58
59
60
61
62
63
64
65
66
databaseName: sphereex_global_index dataSources: global_index: url: jdbc:mysql://localhost:3306/global_index?serverTimezone=UTC&useSSL=false&characterEncoding=utf-8&allowPublicKeyRetrieval=true username: root password: 123456 connectionTimeoutMilliseconds: 30000 idleTimeoutMilliseconds: 60000 maxLifetimeMilliseconds: 1800000 maxPoolSize: 50 minPoolSize: 2 rules: - !SINGLE tables: - "*.*" - !SHARDING tables: t_order: actualDataNodes: global_index.t_order_${0..9} tableStrategy: standard: shardingColumn: order_id shardingAlgorithmName: t_order_inline globalIndexStrategy: globalIndexNames: - t_order_user_id_idx - t_order_merchant_id_idx consistencyLevel: STRONG globalIndexes: t_order_user_id_idx: actualDataNodes: global_index.t_order_user_id_idx_${0..9} databaseStrategy: none: tableStrategy: standard: shardingColumn: user_id shardingAlgorithmName: t_order_user_id_idx_inline coveringColumns: - order_id t_order_merchant_id_idx: actualDataNodes: global_index.t_order_merchant_id_idx_${0..9} databaseStrategy: none: tableStrategy: standard: shardingColumn: merchant_id shardingAlgorithmName: t_order_merchant_id_idx_inline coveringColumns: - order_id - creation_date shardingAlgorithms: t_order_inline: type: INLINE props: algorithm-expression: t_order_${order_id % 10 } t_order_user_id_idx_inline: type: INLINE props: algorithm-expression: t_order_user_id_idx_${user_id % 10 } t_order_merchant_id_idx_inline: type: INLINE props: algorithm-expression: t_order_merchant_id_idx_${merchant_id % 10 }
启动 Demo 程序,可以复现和 E2E 中相同的异常,下面我们就来分析下异常的具体原因。
我们使用最小化 Demo 进行 Debug,可以发现 Proxy 多语句的入口类是 MySQLMultiStatementsHandler,该类目前返回的结果为 UpdateResponseHeader,UpdateResponseHeader 会被封装为单个 MySQLOKPacket,目前执行多语句时,只会简单地将 updated 进行了累加,因此断言时结果不正确。
1
2
3
4
5
6
7
8
9
10
11
12
13
14
private UpdateResponseHeader executeBatchedStatements (final ExecutionGroupContext<JDBCExecutionUnit> executionGroupContext) throws SQLException { boolean isExceptionThrown = SQLExecutorExceptionHandler.isExceptionThrown(); ResourceMetaData resourceMetaData = metaDataContexts.getMetaData().getDatabase(connectionSession.getUsedDatabaseName()).getResourceMetaData(); JDBCExecutorCallback<int []> callback = new BatchedJDBCExecutorCallback (resourceMetaData, sqlStatementSample, isExceptionThrown); List<int []> executeResults = jdbcExecutor.execute(executionGroupContext, callback); int updated = 0 ; for (int [] eachResult : executeResults) { for (int each : eachResult) { updated += each; } } return new UpdateResponseHeader (sqlStatementSample, Collections.singletonList(new UpdateResult (updated, 0L ))); }
根据此处的 TODO 标记可以看出,MySQL 执行多语句时,需要返回批量的 MySQLOKPacket 集合,分别对应每条语句的执行结果。为了解决这个问题,需要增加一个 MultiStatementsUpdateResponseHeader 类进行封装,将多个 MySQLOKPacket 集合封装到其中:
1 2 3 4 5 6 7 8 9 @RequiredArgsConstructor @Getter public final class MultiStatementsUpdateResponseHeader implements ResponseHeader { private final Collection<UpdateResponseHeader> updateResponseHeaders; }
然后在 MySQLComQueryPacketExecutor 执行器类中,对 MultiStatementsUpdateResponseHeader 进行处理,具体处理逻辑如下,根据 MultiStatementsUpdateResponseHeader 中维护的 UpdateResponseHeader 集合,将其组装为多个 MySQLOKPacket。
1
2
3
4
5
6
7
8
9
10
11
12
13
14
15
16
17
18
19
20
21
22
@Override public Collection<DatabasePacket> execute () throws SQLException { ResponseHeader responseHeader = proxyBackendHandler.execute(); if (responseHeader instanceof QueryResponseHeader) { return processQuery((QueryResponseHeader) responseHeader); } responseType = ResponseType.UPDATE; if (responseHeader instanceof MultiStatementsUpdateResponseHeader) { return processMultiStatementsUpdate((MultiStatementsUpdateResponseHeader) responseHeader); } return processUpdate((UpdateResponseHeader) responseHeader); } private Collection<DatabasePacket> processMultiStatementsUpdate (final MultiStatementsUpdateResponseHeader responseHeader) { Collection<DatabasePacket> result = new LinkedList <>(); int index = 0 ; for (UpdateResponseHeader each : responseHeader.getUpdateResponseHeaders()) { boolean lastPacket = ++index == responseHeader.getUpdateResponseHeaders().size(); result.addAll(ResponsePacketBuilder.buildUpdateResponsePackets(each, ServerStatusFlagCalculator.calculateFor(connectionSession, lastPacket))); } return result; }
此时,我们再次进行测试,但是发现结果仍然不正确,这又是为什么呢?想要搞清楚 MySQL 内部协议的交互逻辑,我们需要通过 WireShark 进行抓包,对比原生 MySQL 批量语句执行和 Proxy 批量语句执行之间的差异。
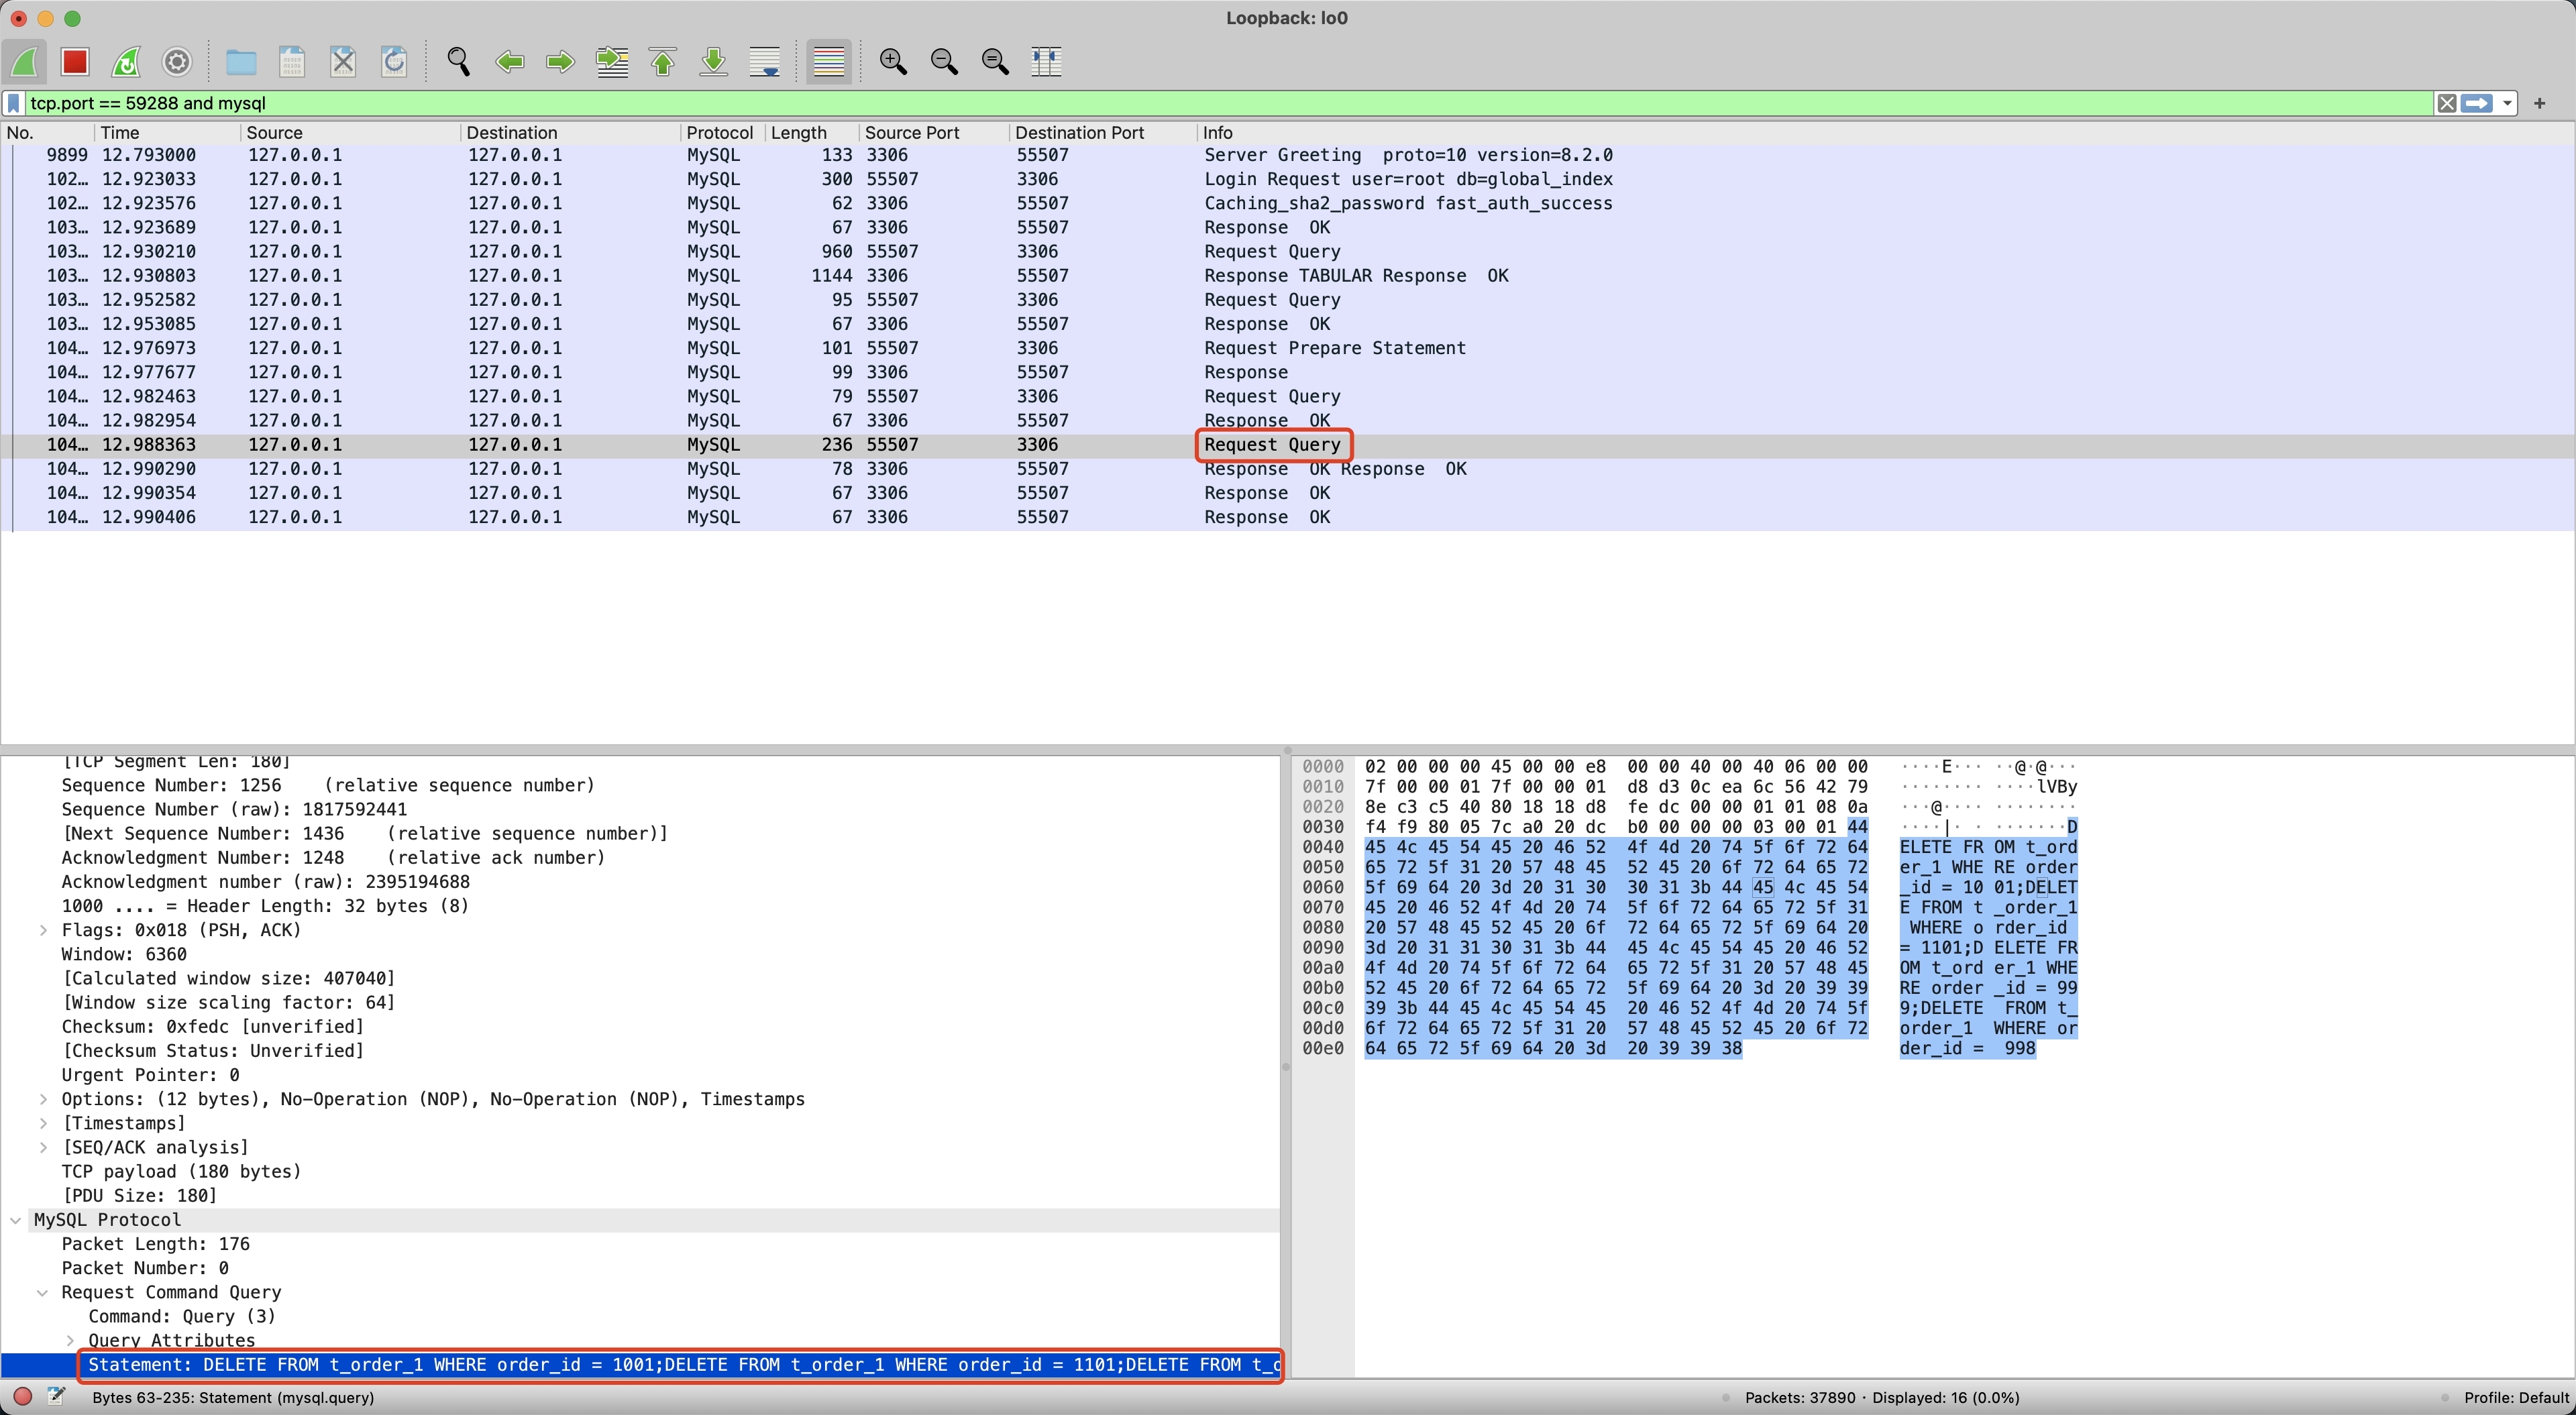
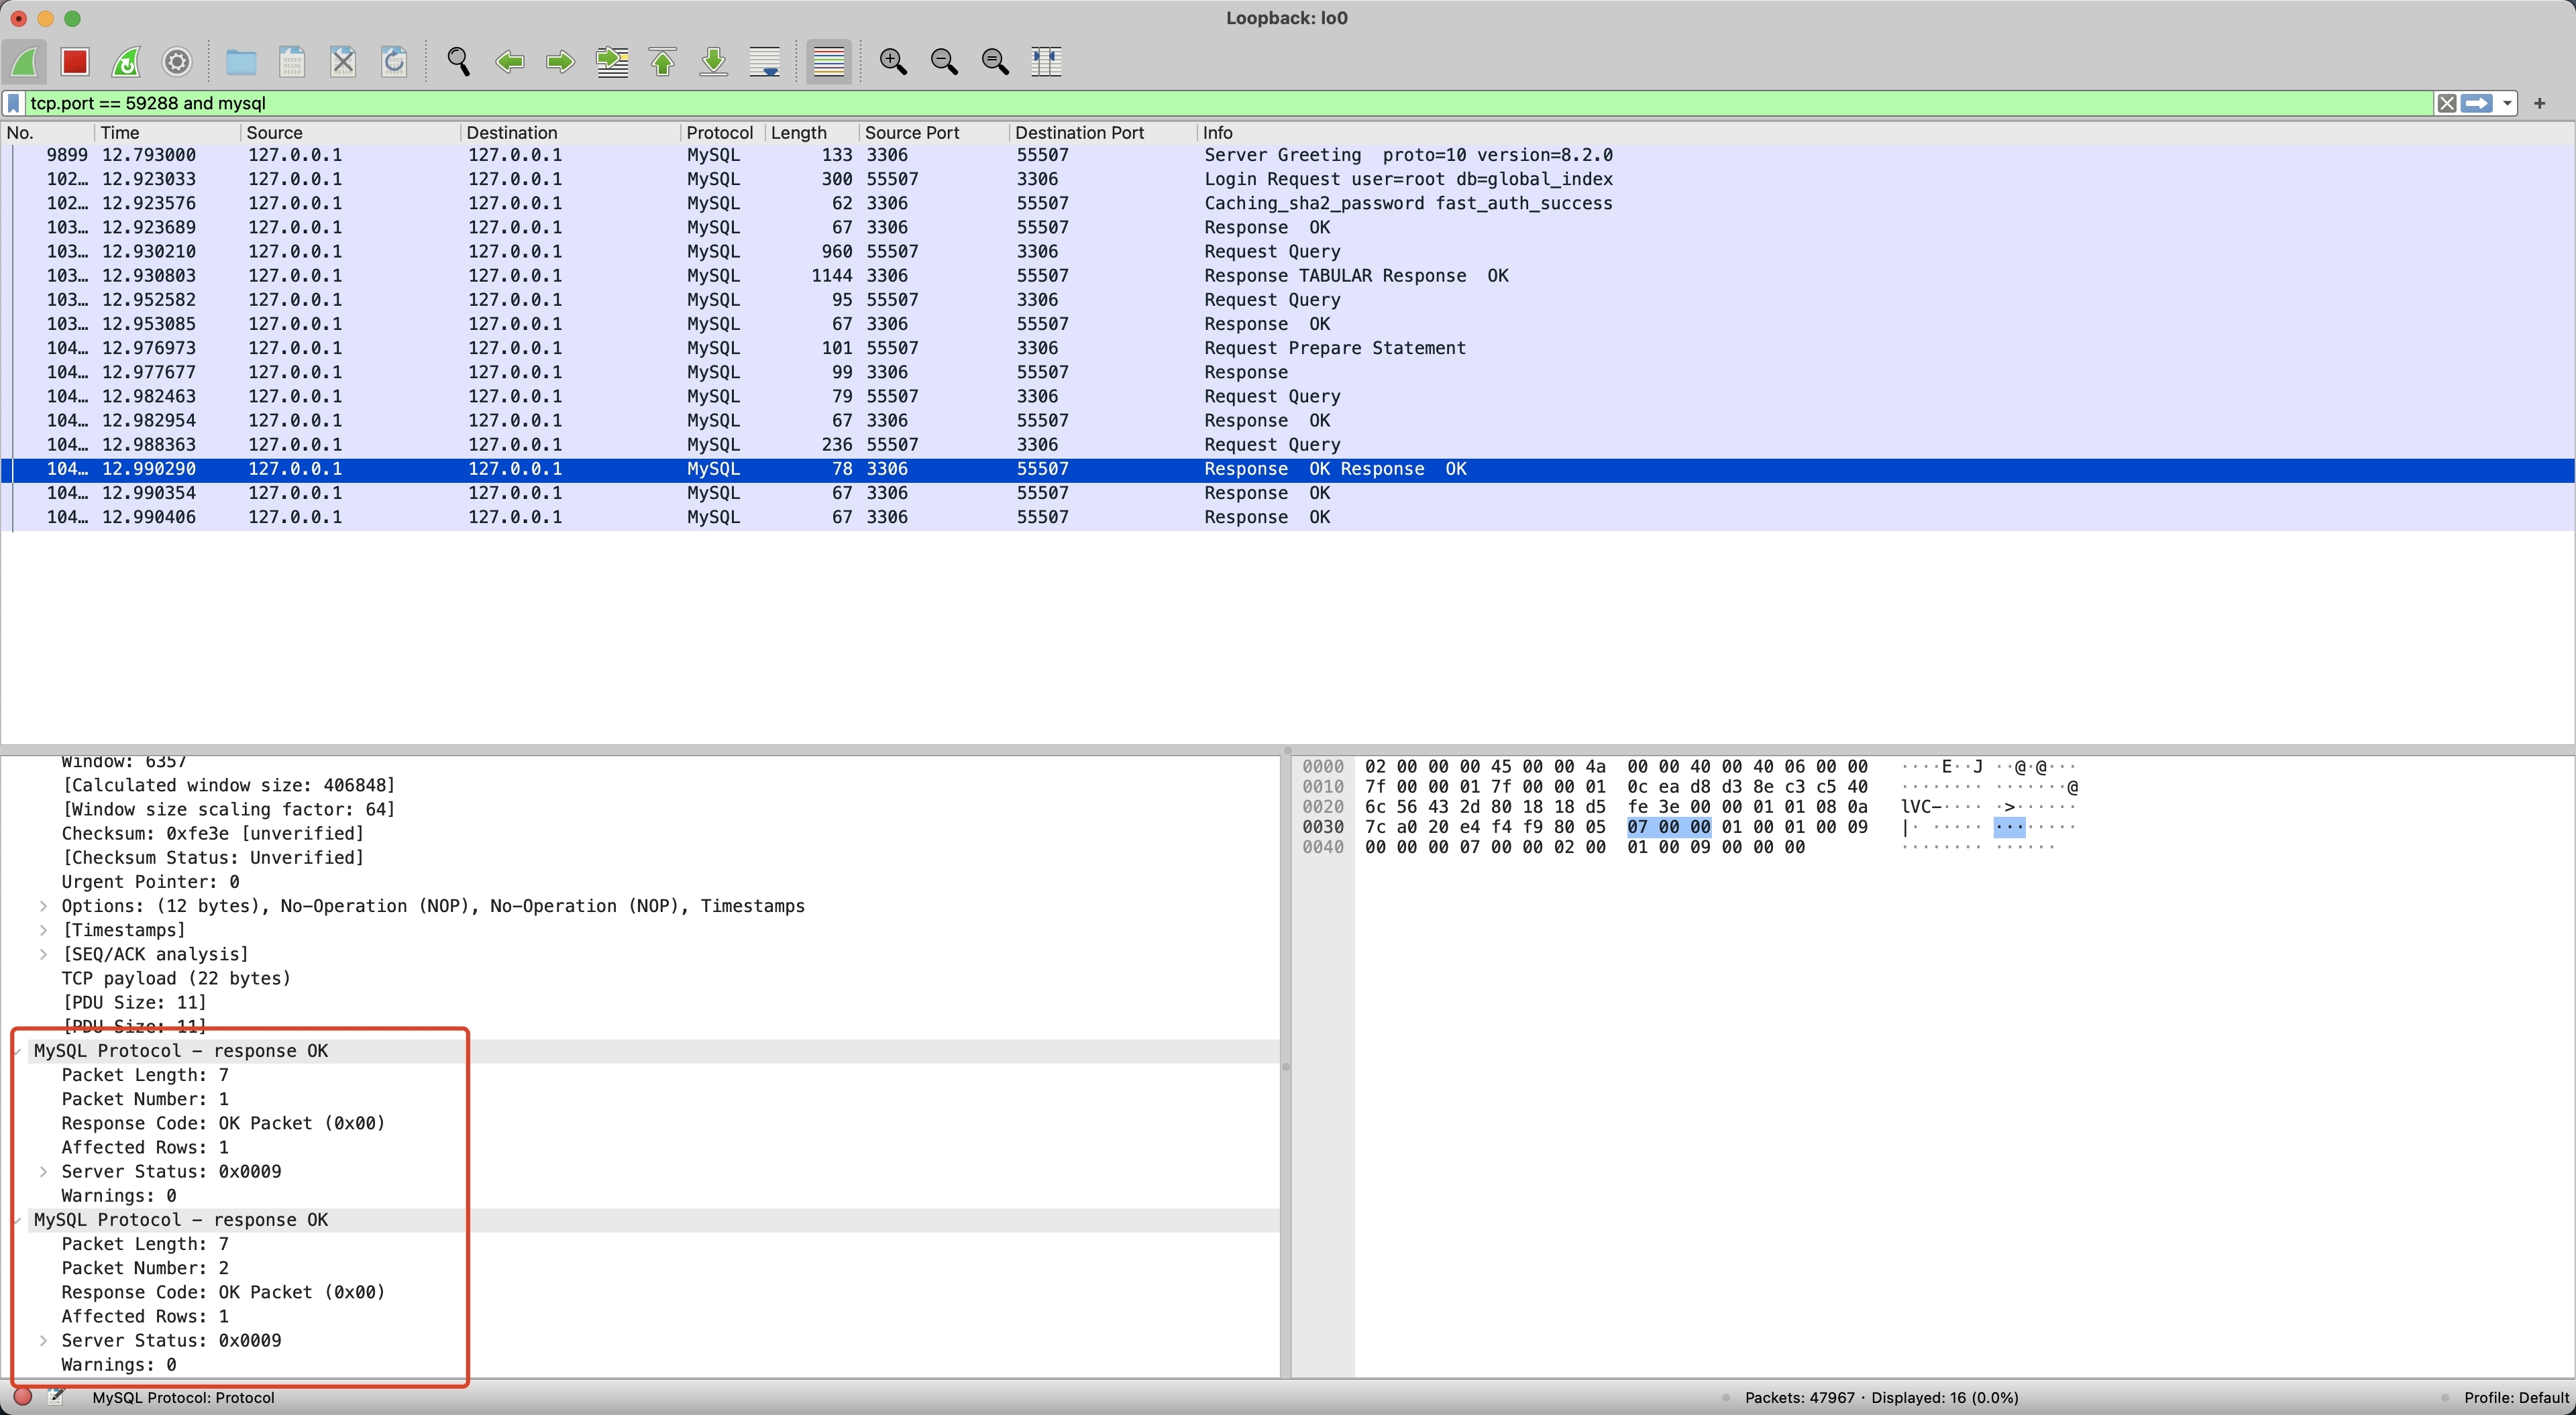
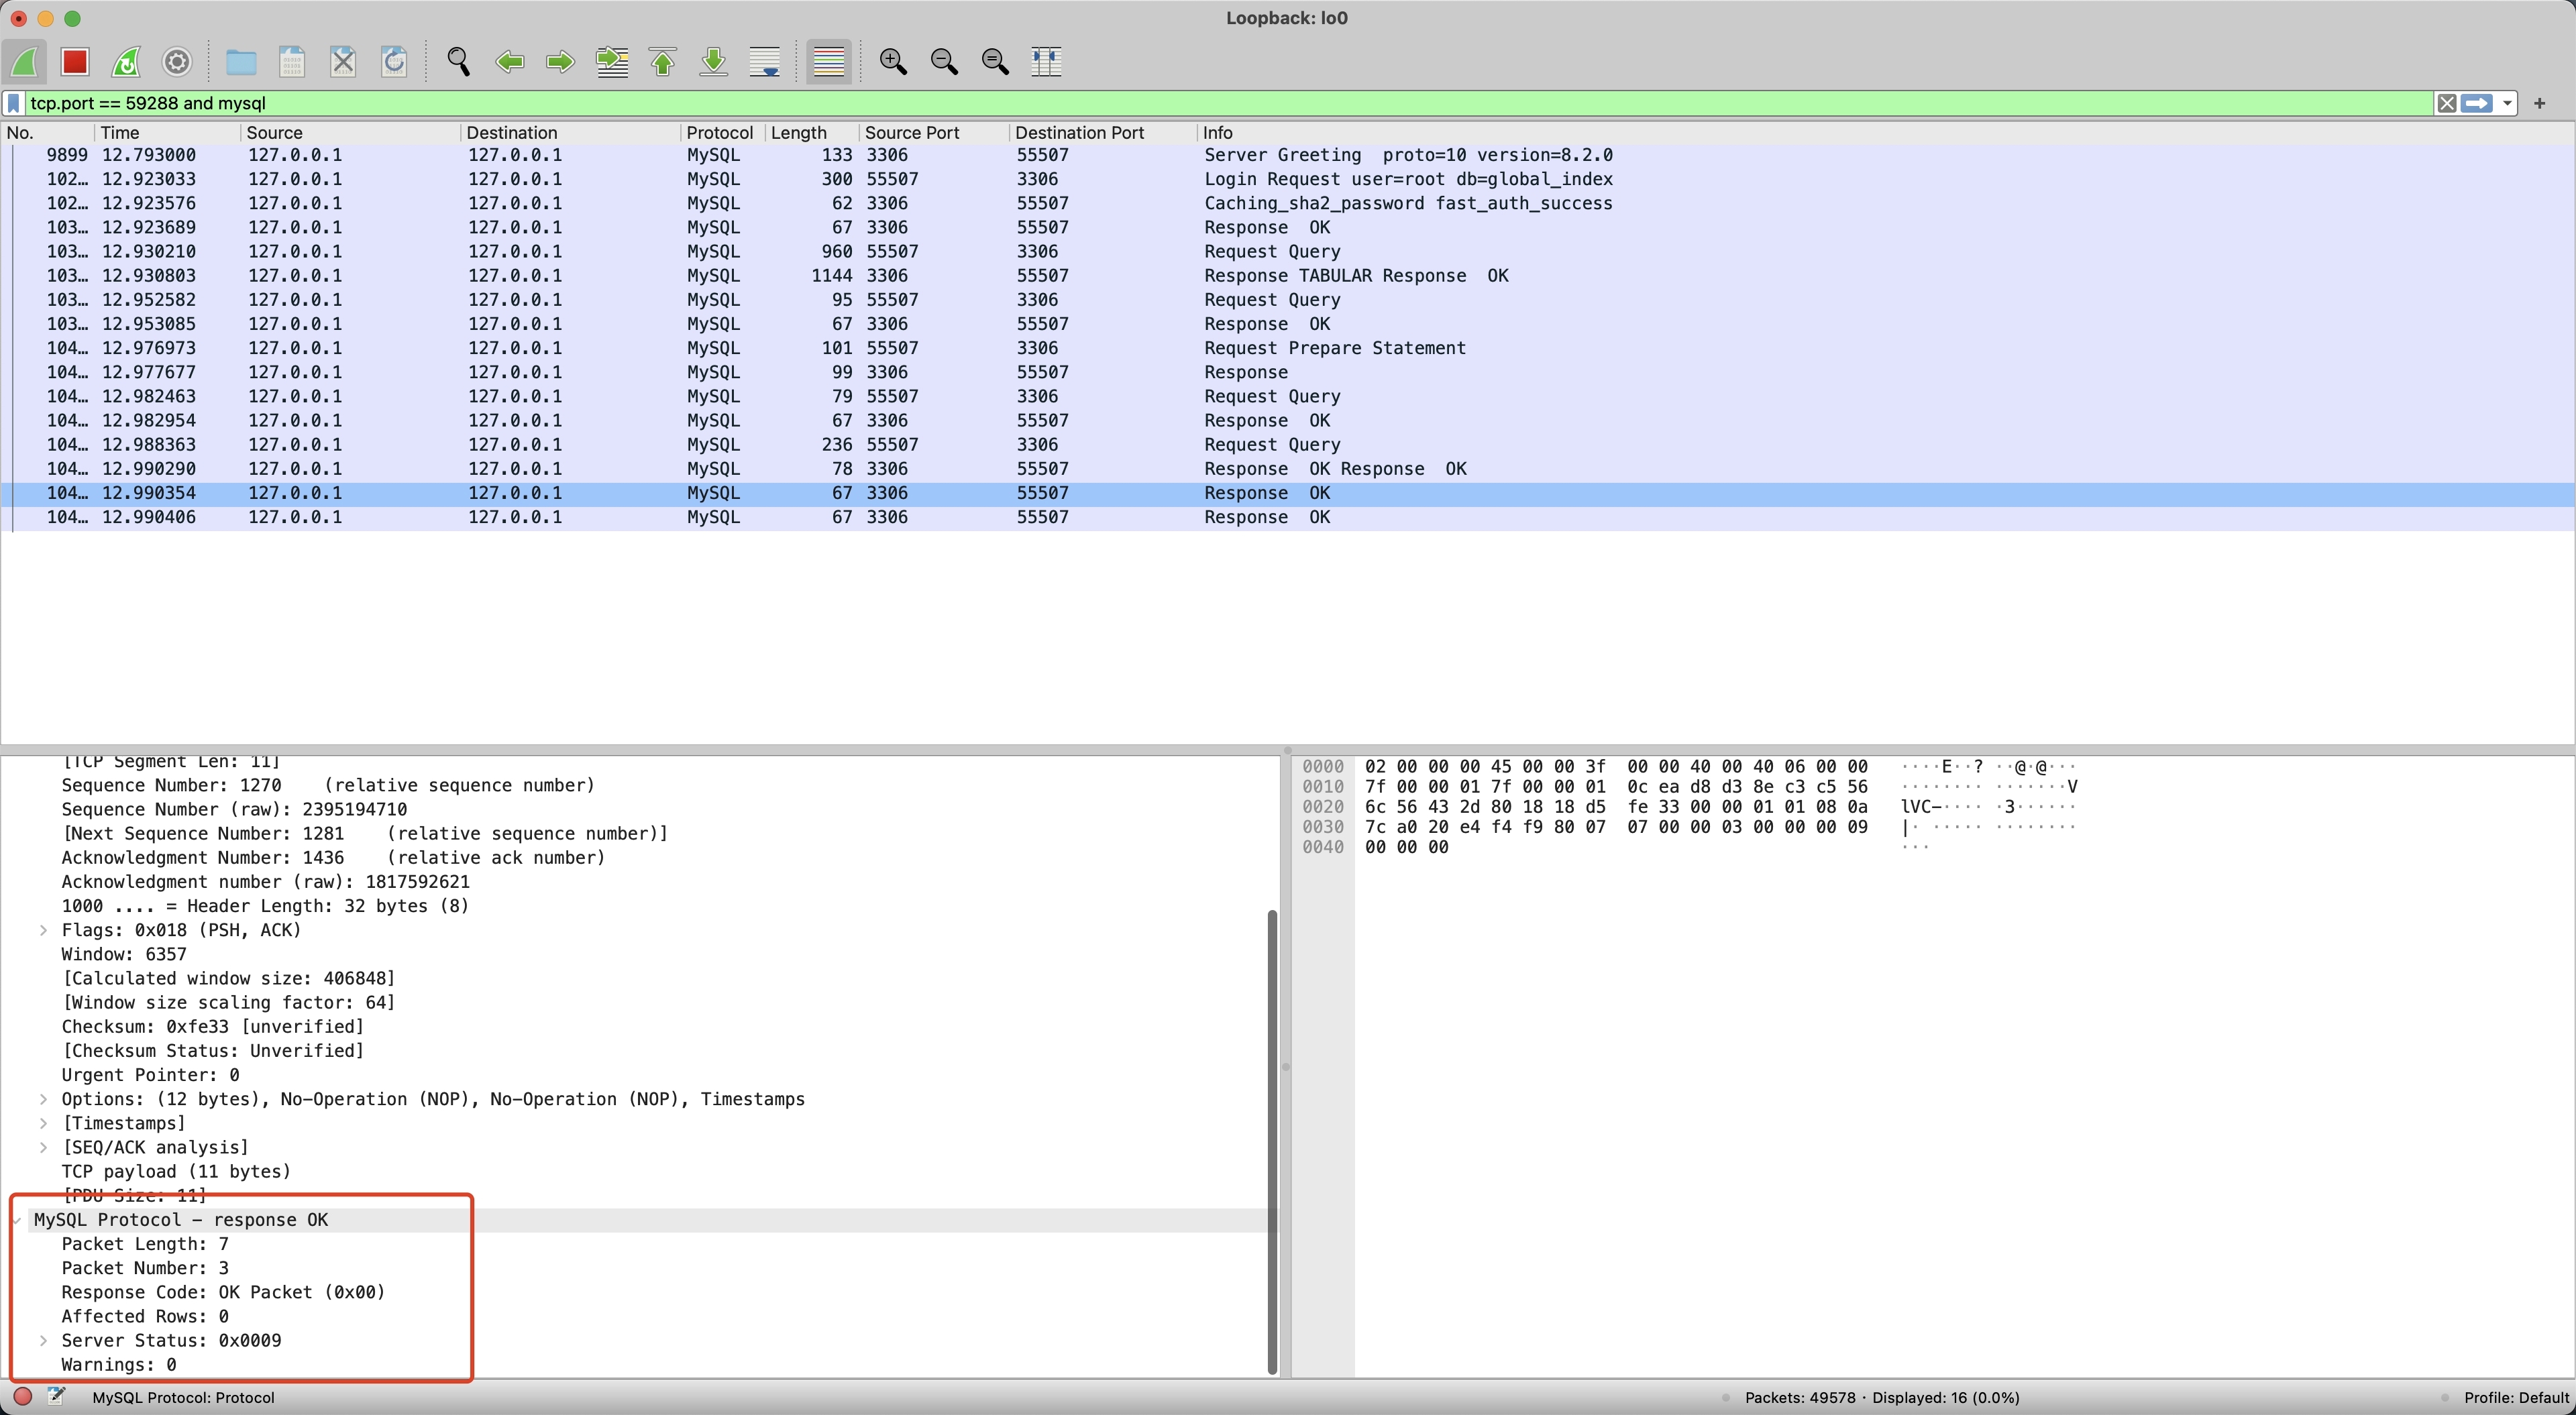
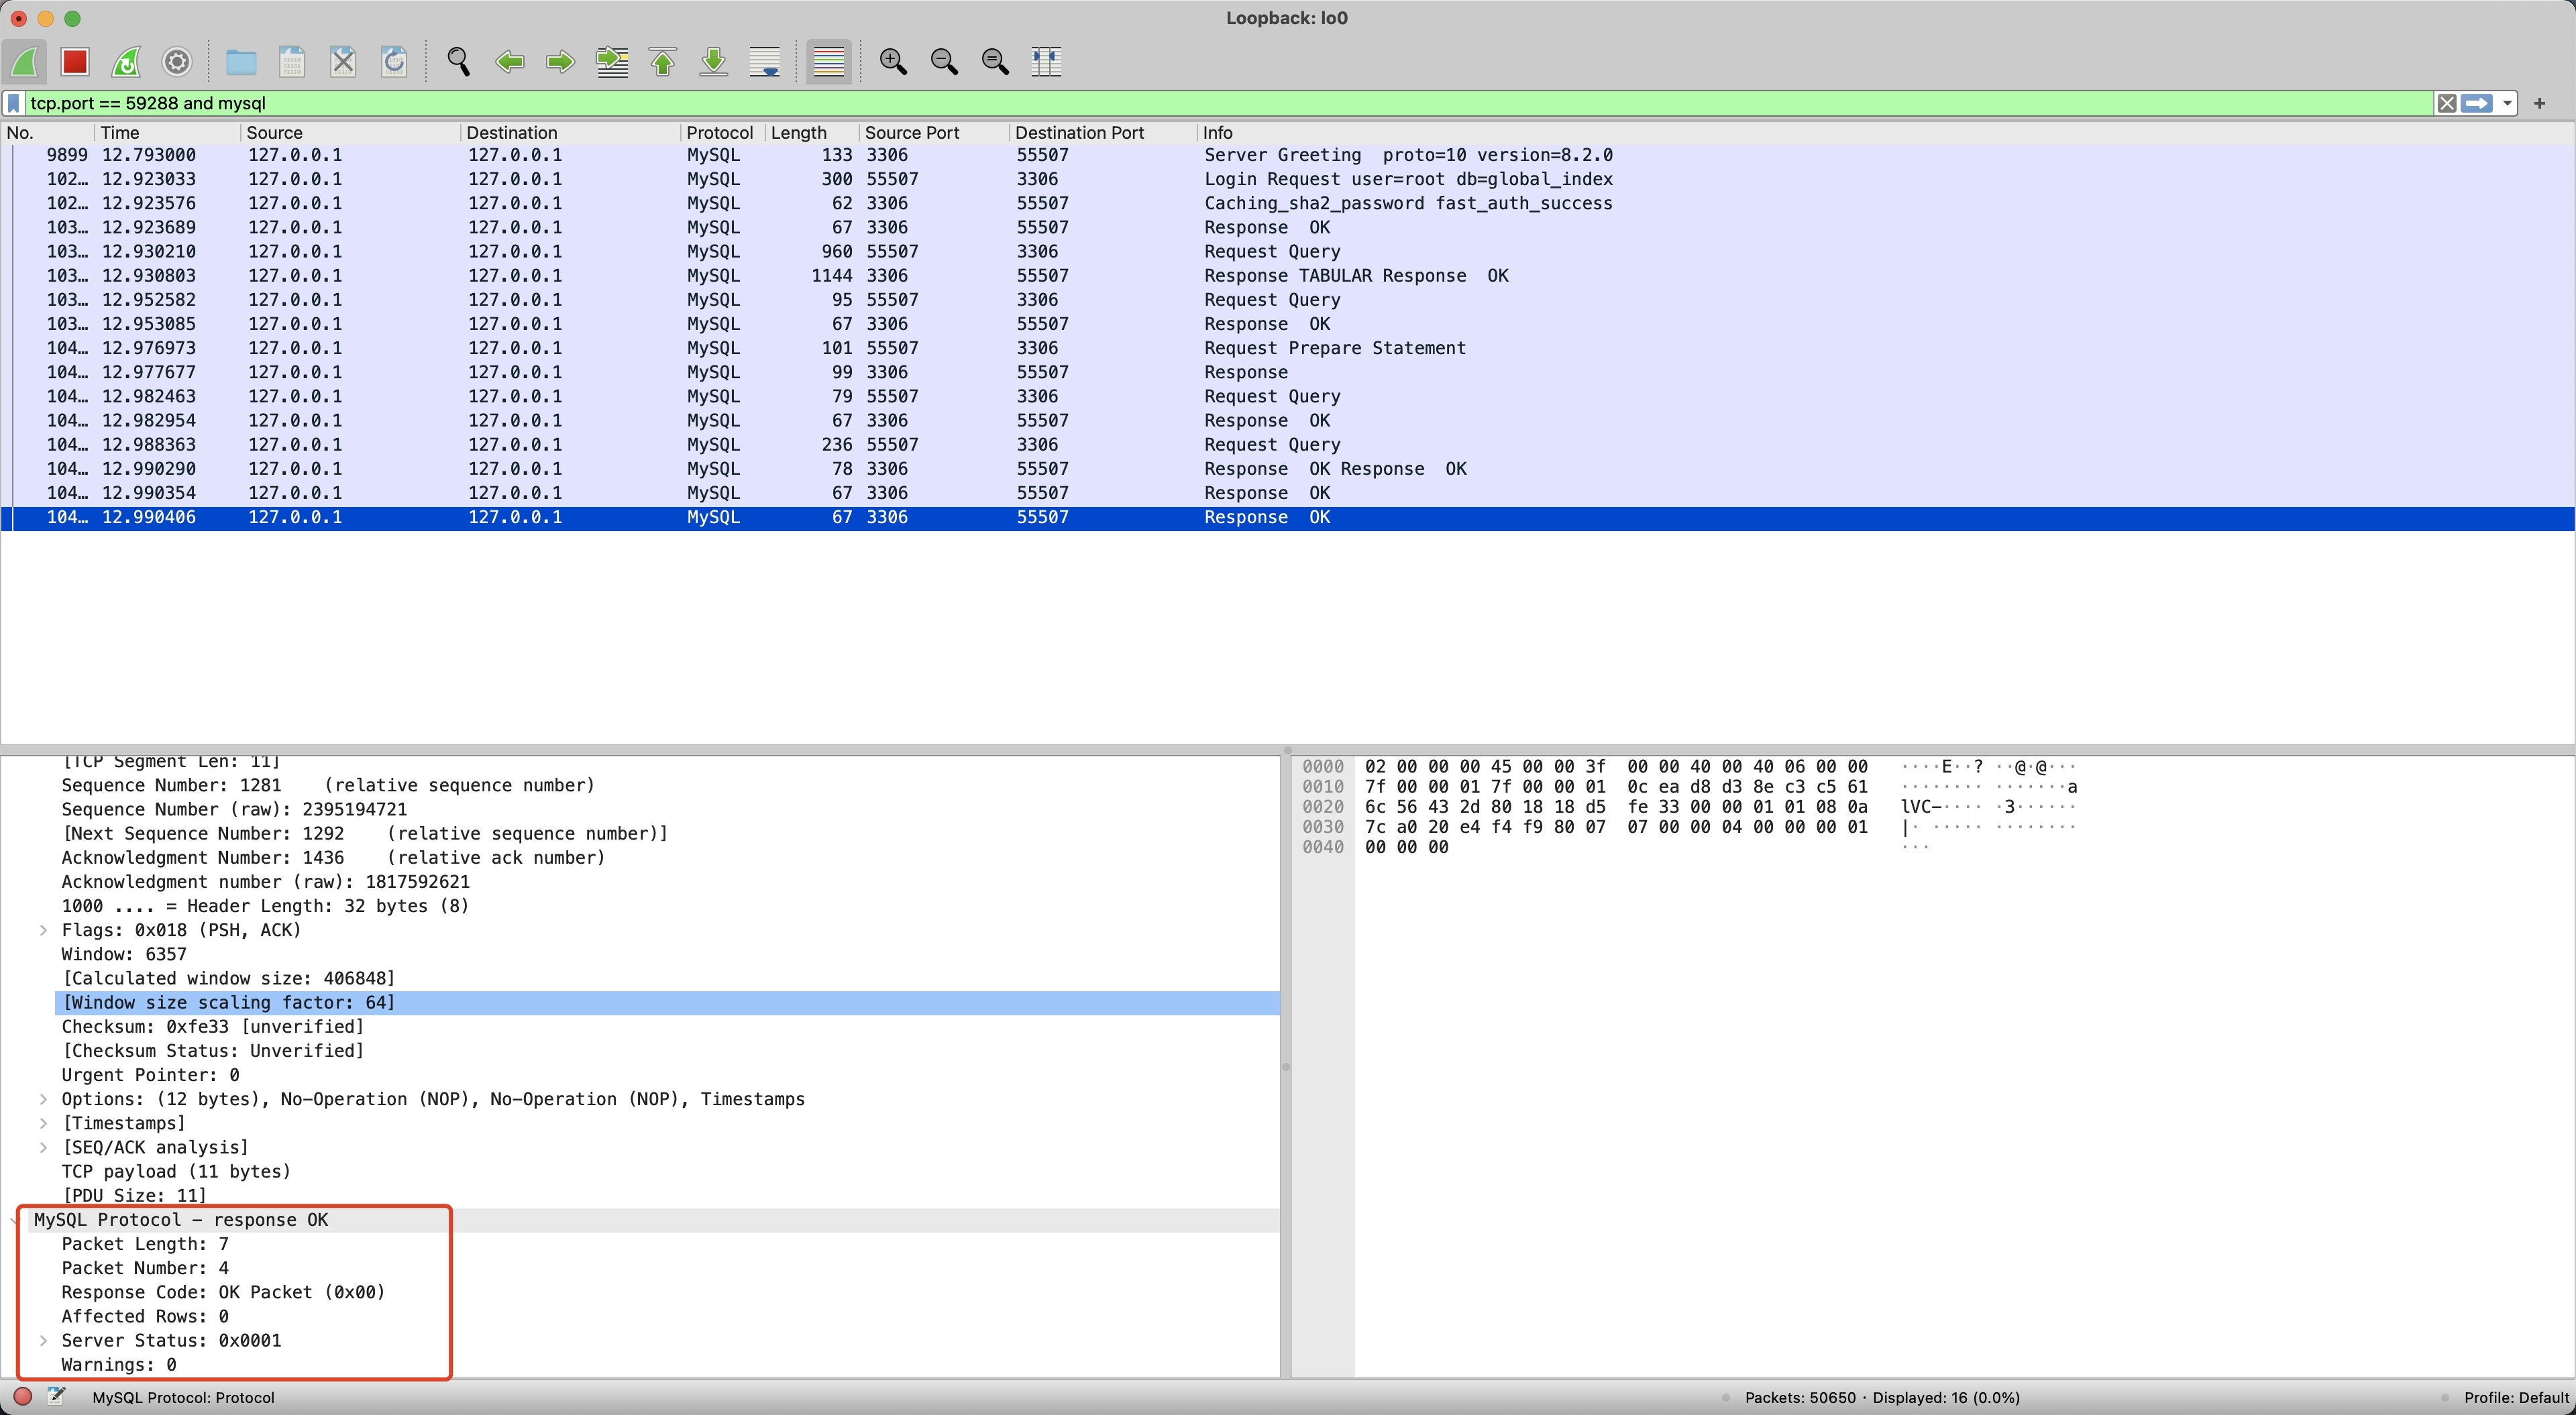
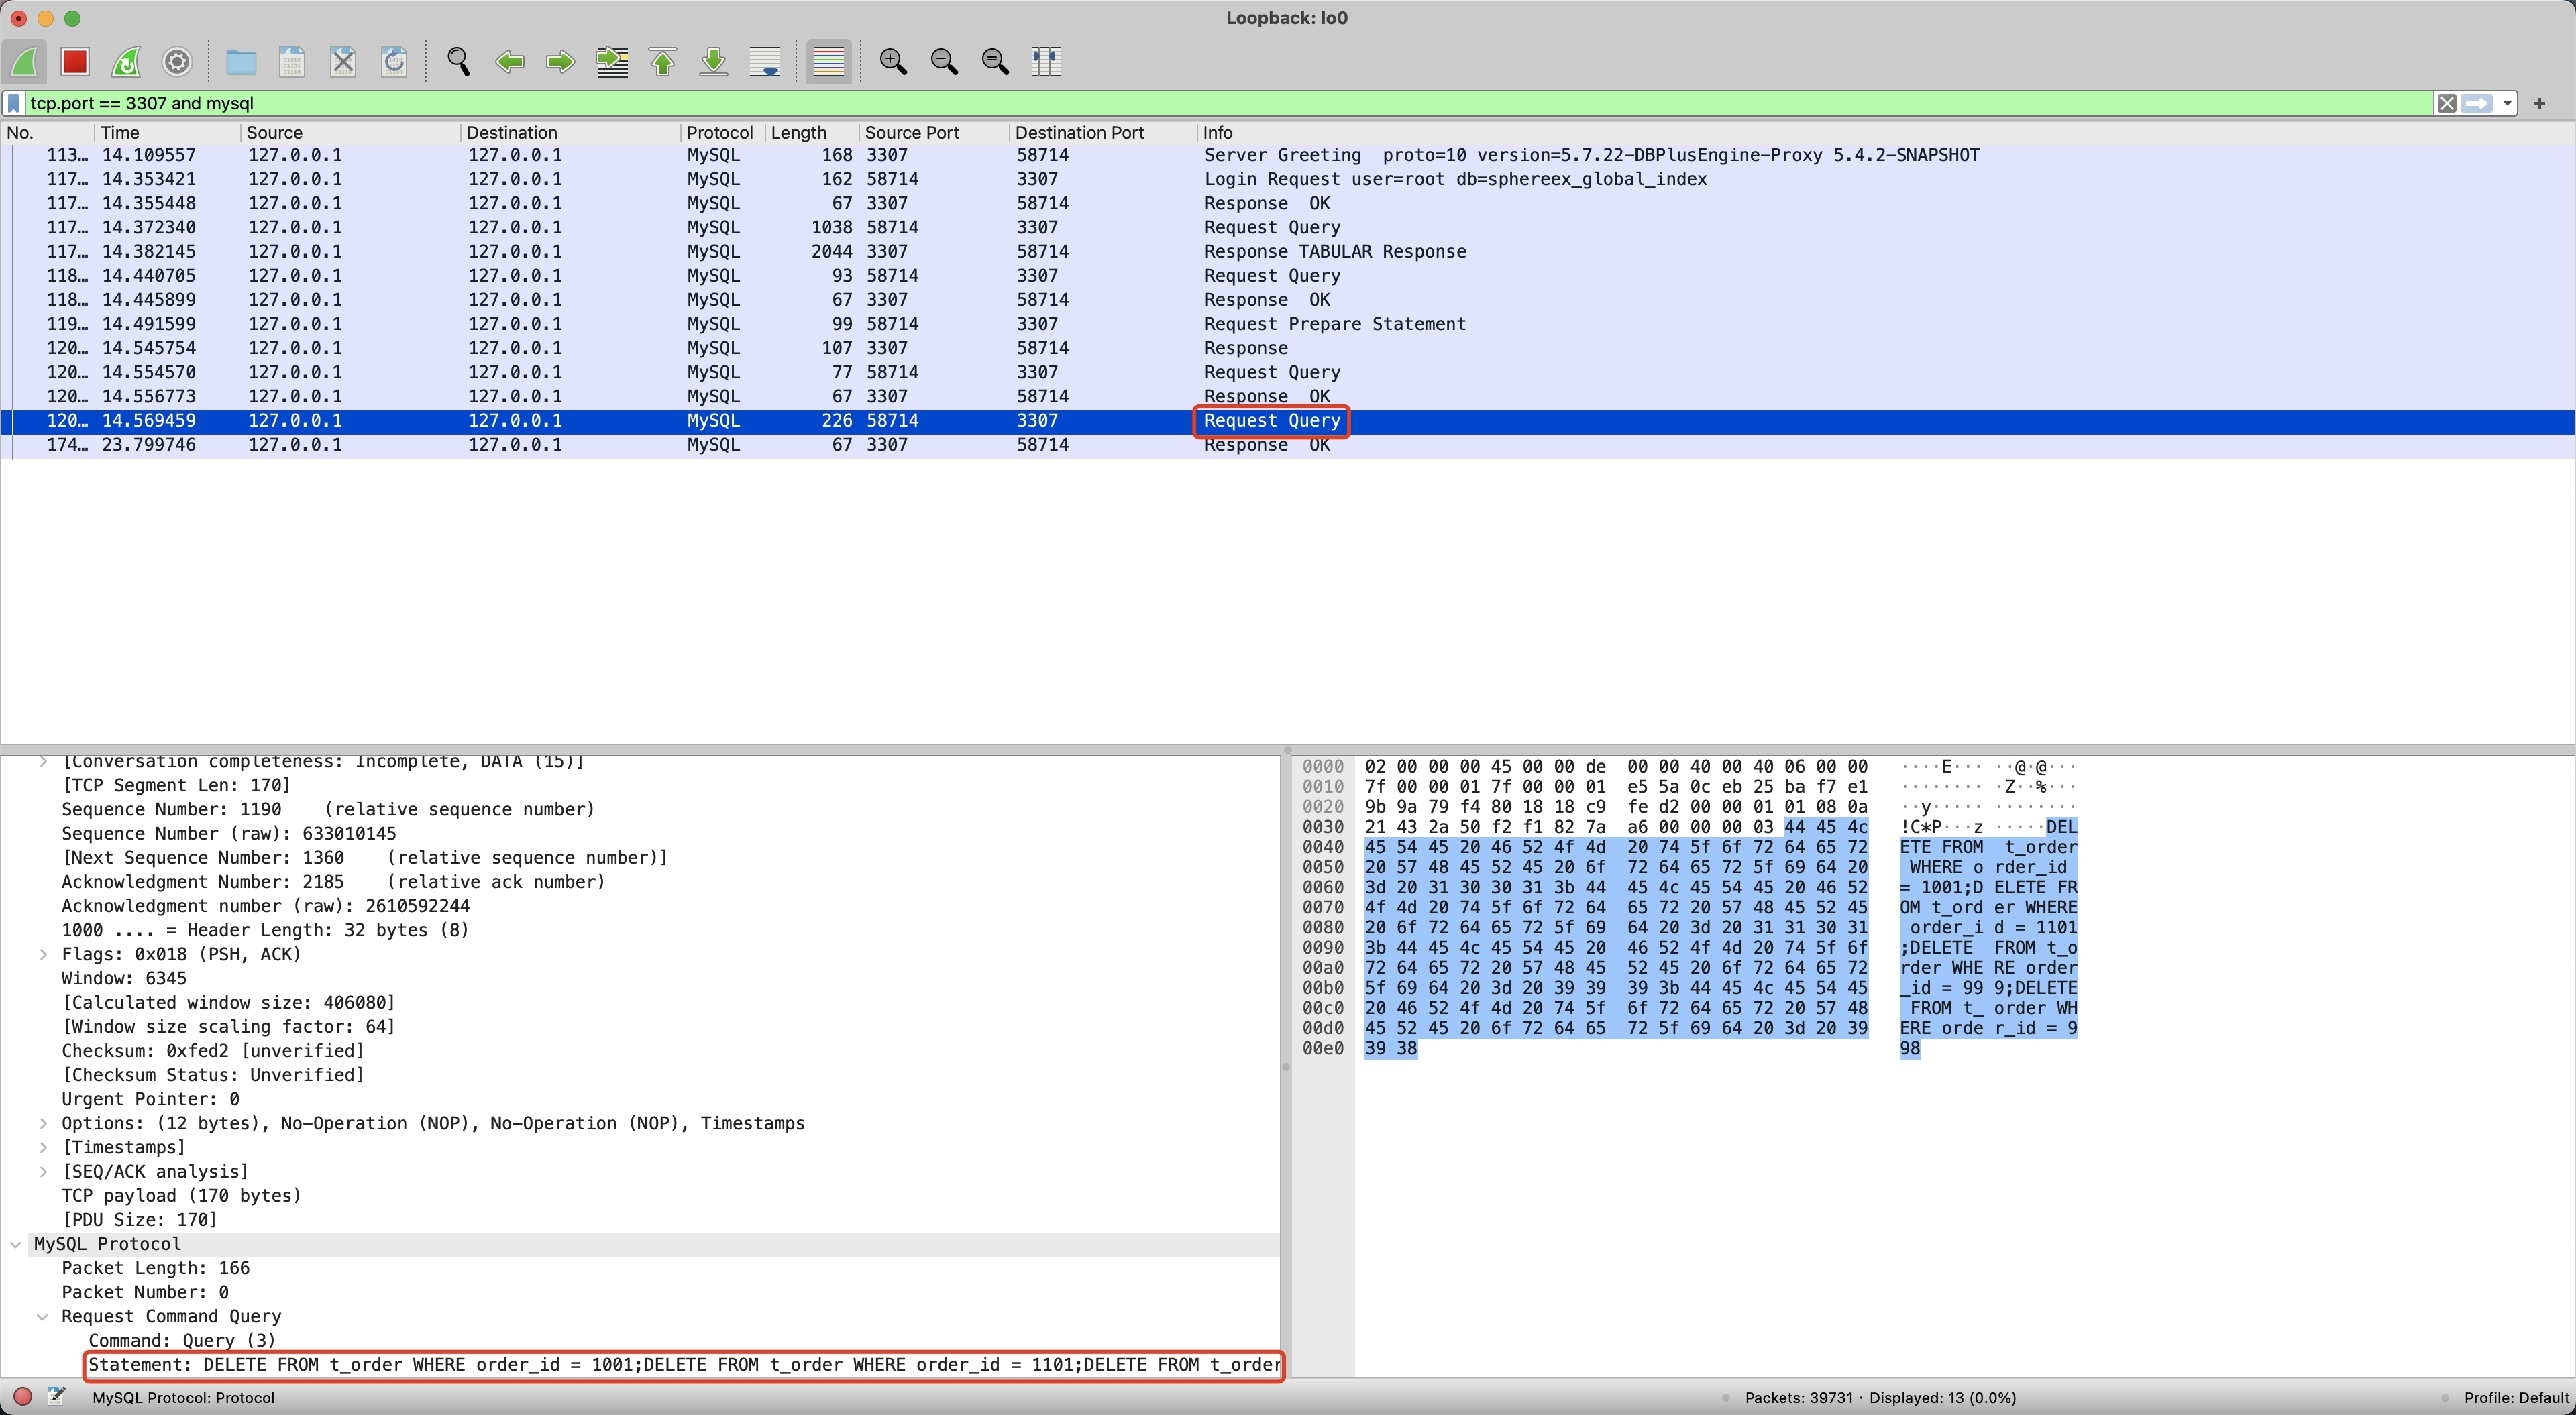
为了搞清楚 Proxy 和 MySQL 之间的差异,我们分别执行 Demo 程序中的 Proxy 示例和 MySQL 示例,并使用 WireShark 进行抓包(WireShark 使用可参考使用 Wireshark 解决 BenchmarkSQL 压测 Proxy 异常 )。首先,我们执行 MySQL 批量写入并进行抓包,如下记录了抓包的内容,包括了 1 次 Request 和 4 次 Response。
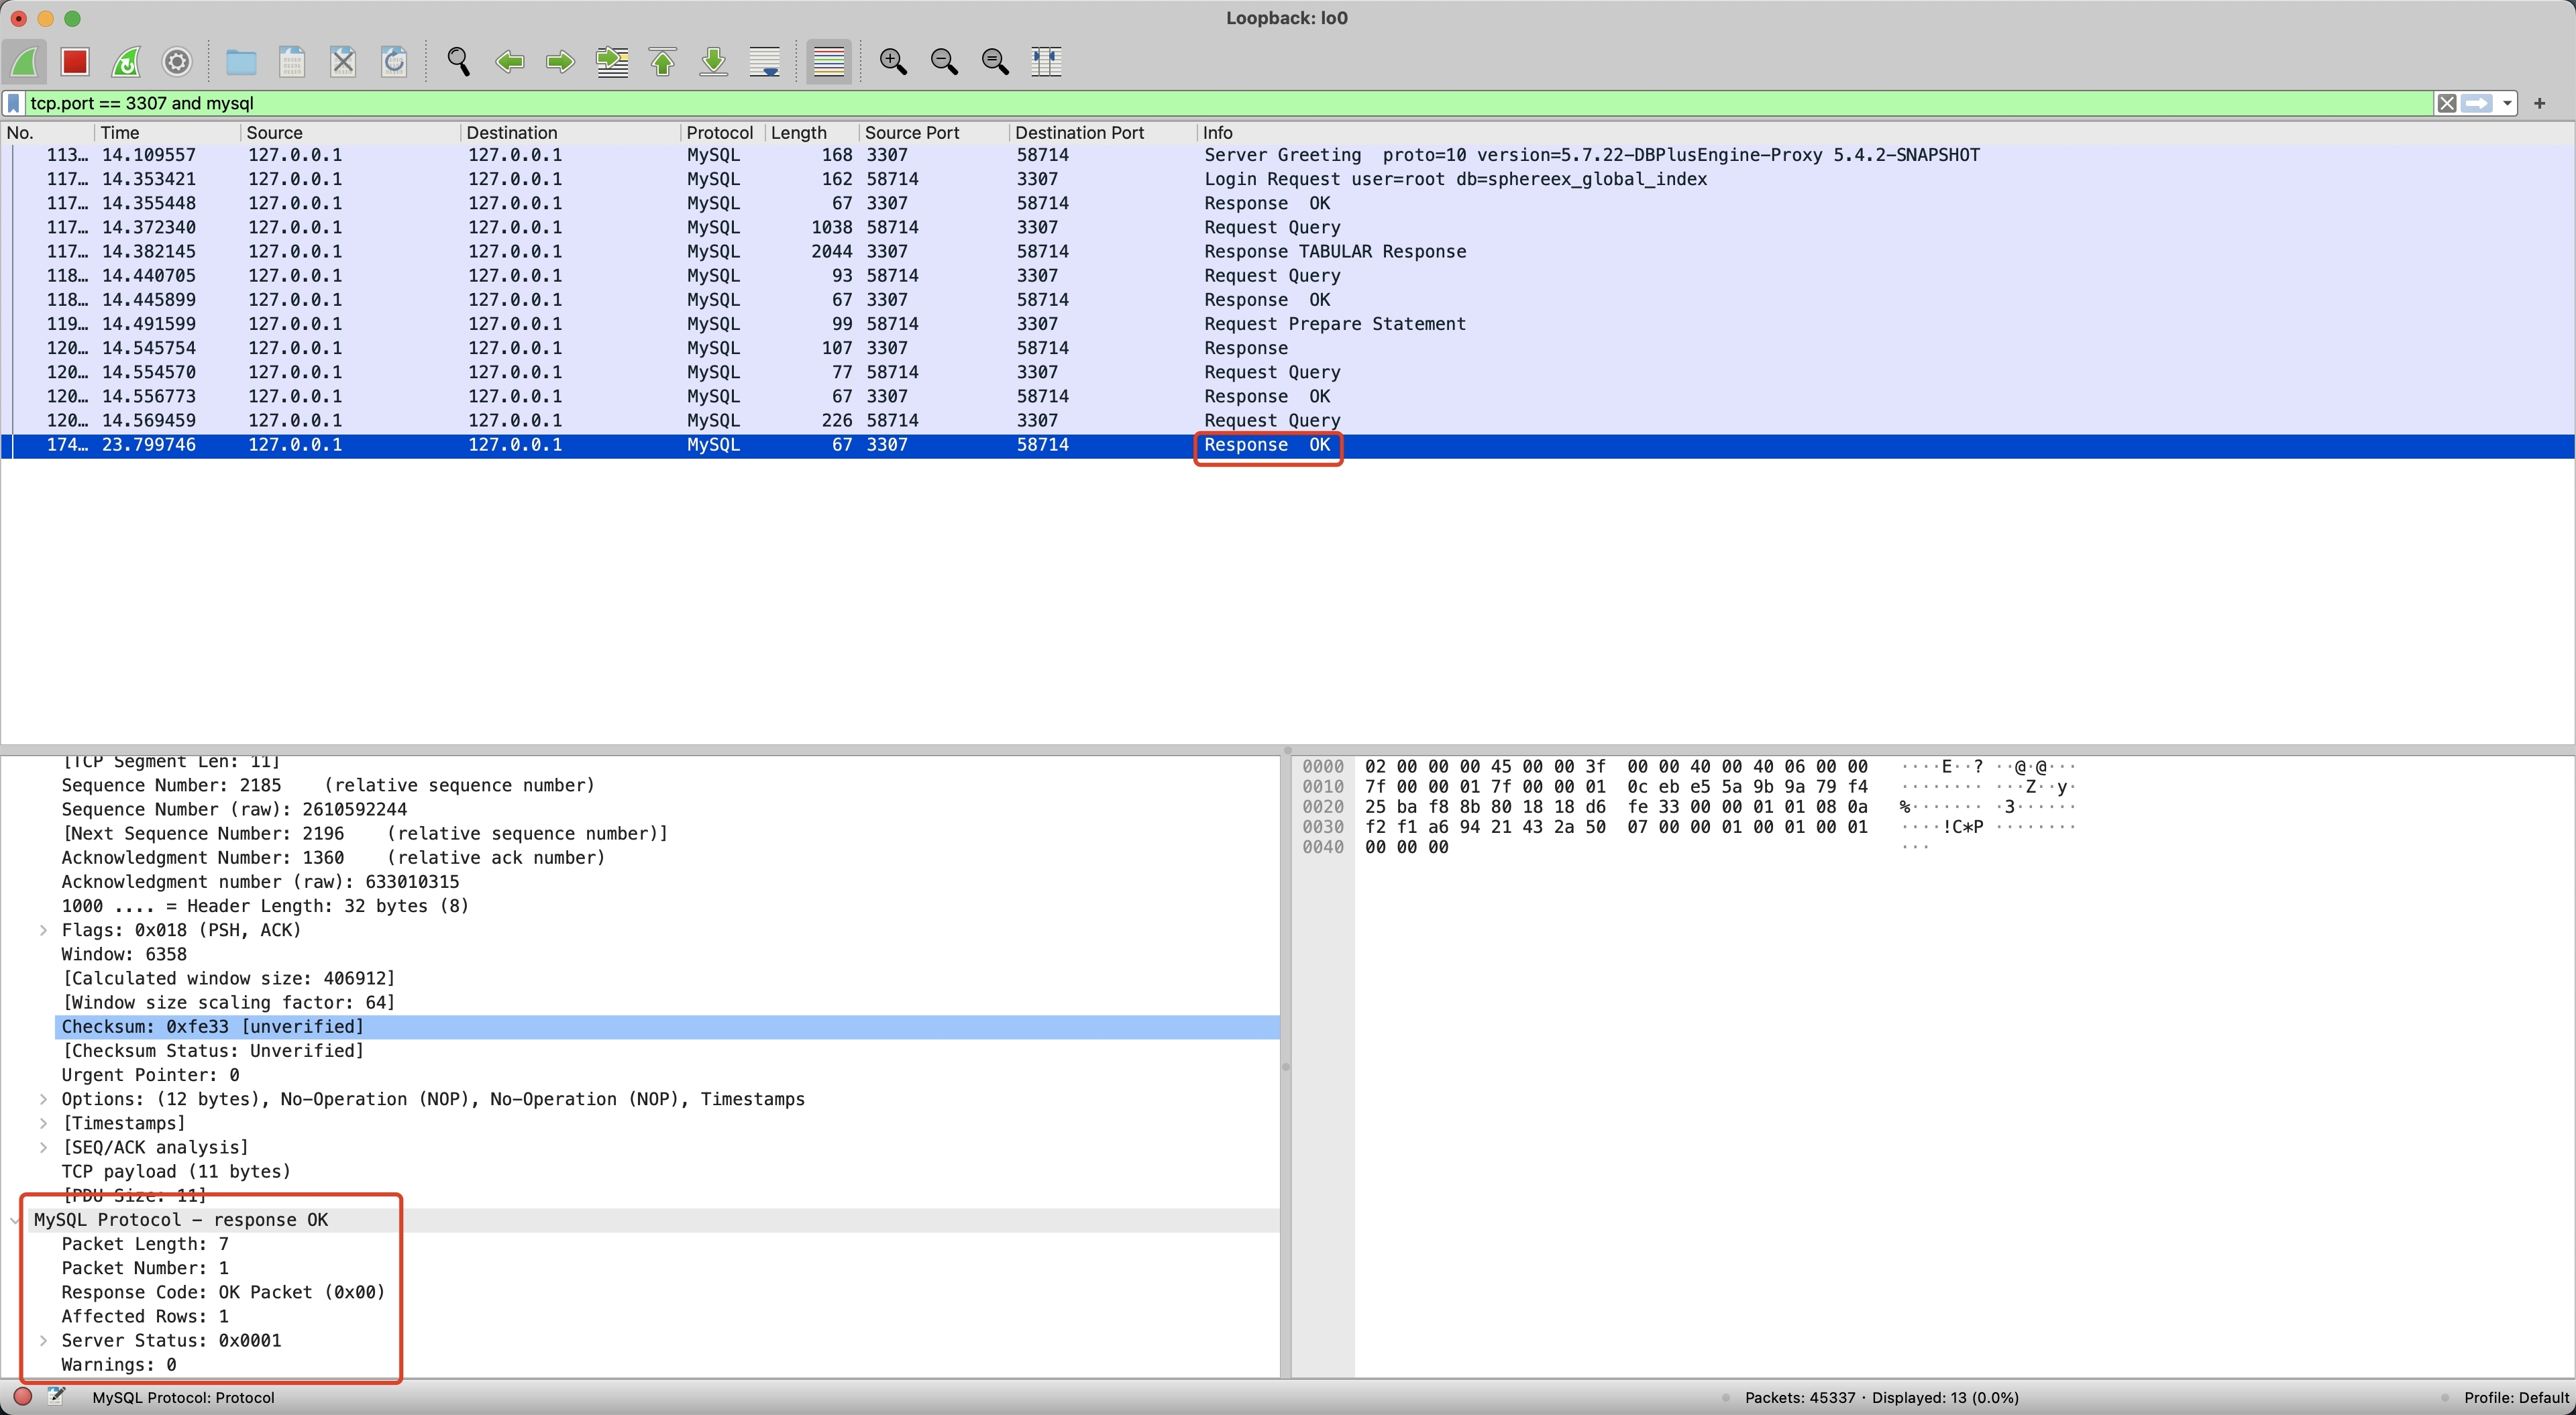
然后我们再执行 Proxy 批量写入,并使用 WireShark 抓包,如下记录了 Proxy 抓包的内容,只有 1 次 Request 和 1 次 Response。
对比 MySQL 和 Proxy 抓包的差异,可以发现 MySQL 直到最后一个 MySQLOKPacket Server Status 才变为 1,前三个 MySQLOKPacket Server Status 都为 9(8 多语句 SERVER_MORE_RESULTS_EXISTS + 1 事务中 SERVER_STATUS_IN_TRANS),而 Proxy 第一个 Response 就返回了 1,并且后续不再返回 Response。
排查 MySQL 驱动可以发现,如果 SQL Response 中的 ServerStatusFlag 不包含 MySQLStatusFlag.SERVER_MORE_RESULTS_EXISTS,MySQL 驱动就只会读取第一个 MySQLOKPacket,并填充到客户端 int[] 数组中。因此可以考虑在封装多语句 MySQLOKPacket 时,根据多语句是否为最后一条,决定该标记的设置,当 MySQLOKPacket 未遍历到最后一条记录时,应设置 SERVER_MORE_RESULTS_EXISTS 标记。
我们调整 ServerStatusFlagCalculator#calculateFor 方法的实现逻辑,根据传入的 lastPacket 标记,决定是否设置 SERVER_MORE_RESULTS_EXISTS,具体实现逻辑如下:
1 2 3 4 5 6 7 8 9 10 11 12 13 14 public static int calculateFor (final ConnectionSession connectionSession, final boolean lastPacket) { int result = 0 ; result |= connectionSession.isAutoCommit() ? MySQLStatusFlag.SERVER_STATUS_AUTOCOMMIT.getValue() : 0 ; result |= connectionSession.getTransactionStatus().isInTransaction() ? MySQLStatusFlag.SERVER_STATUS_IN_TRANS.getValue() : 0 ; result |= lastPacket ? 0 : MySQLStatusFlag.SERVER_MORE_RESULTS_EXISTS.getValue(); return result; }
修改完成后,我们再次运行测试程序,发现此时直接出现了 NPE,需要进一步分析 NPE 的原因。
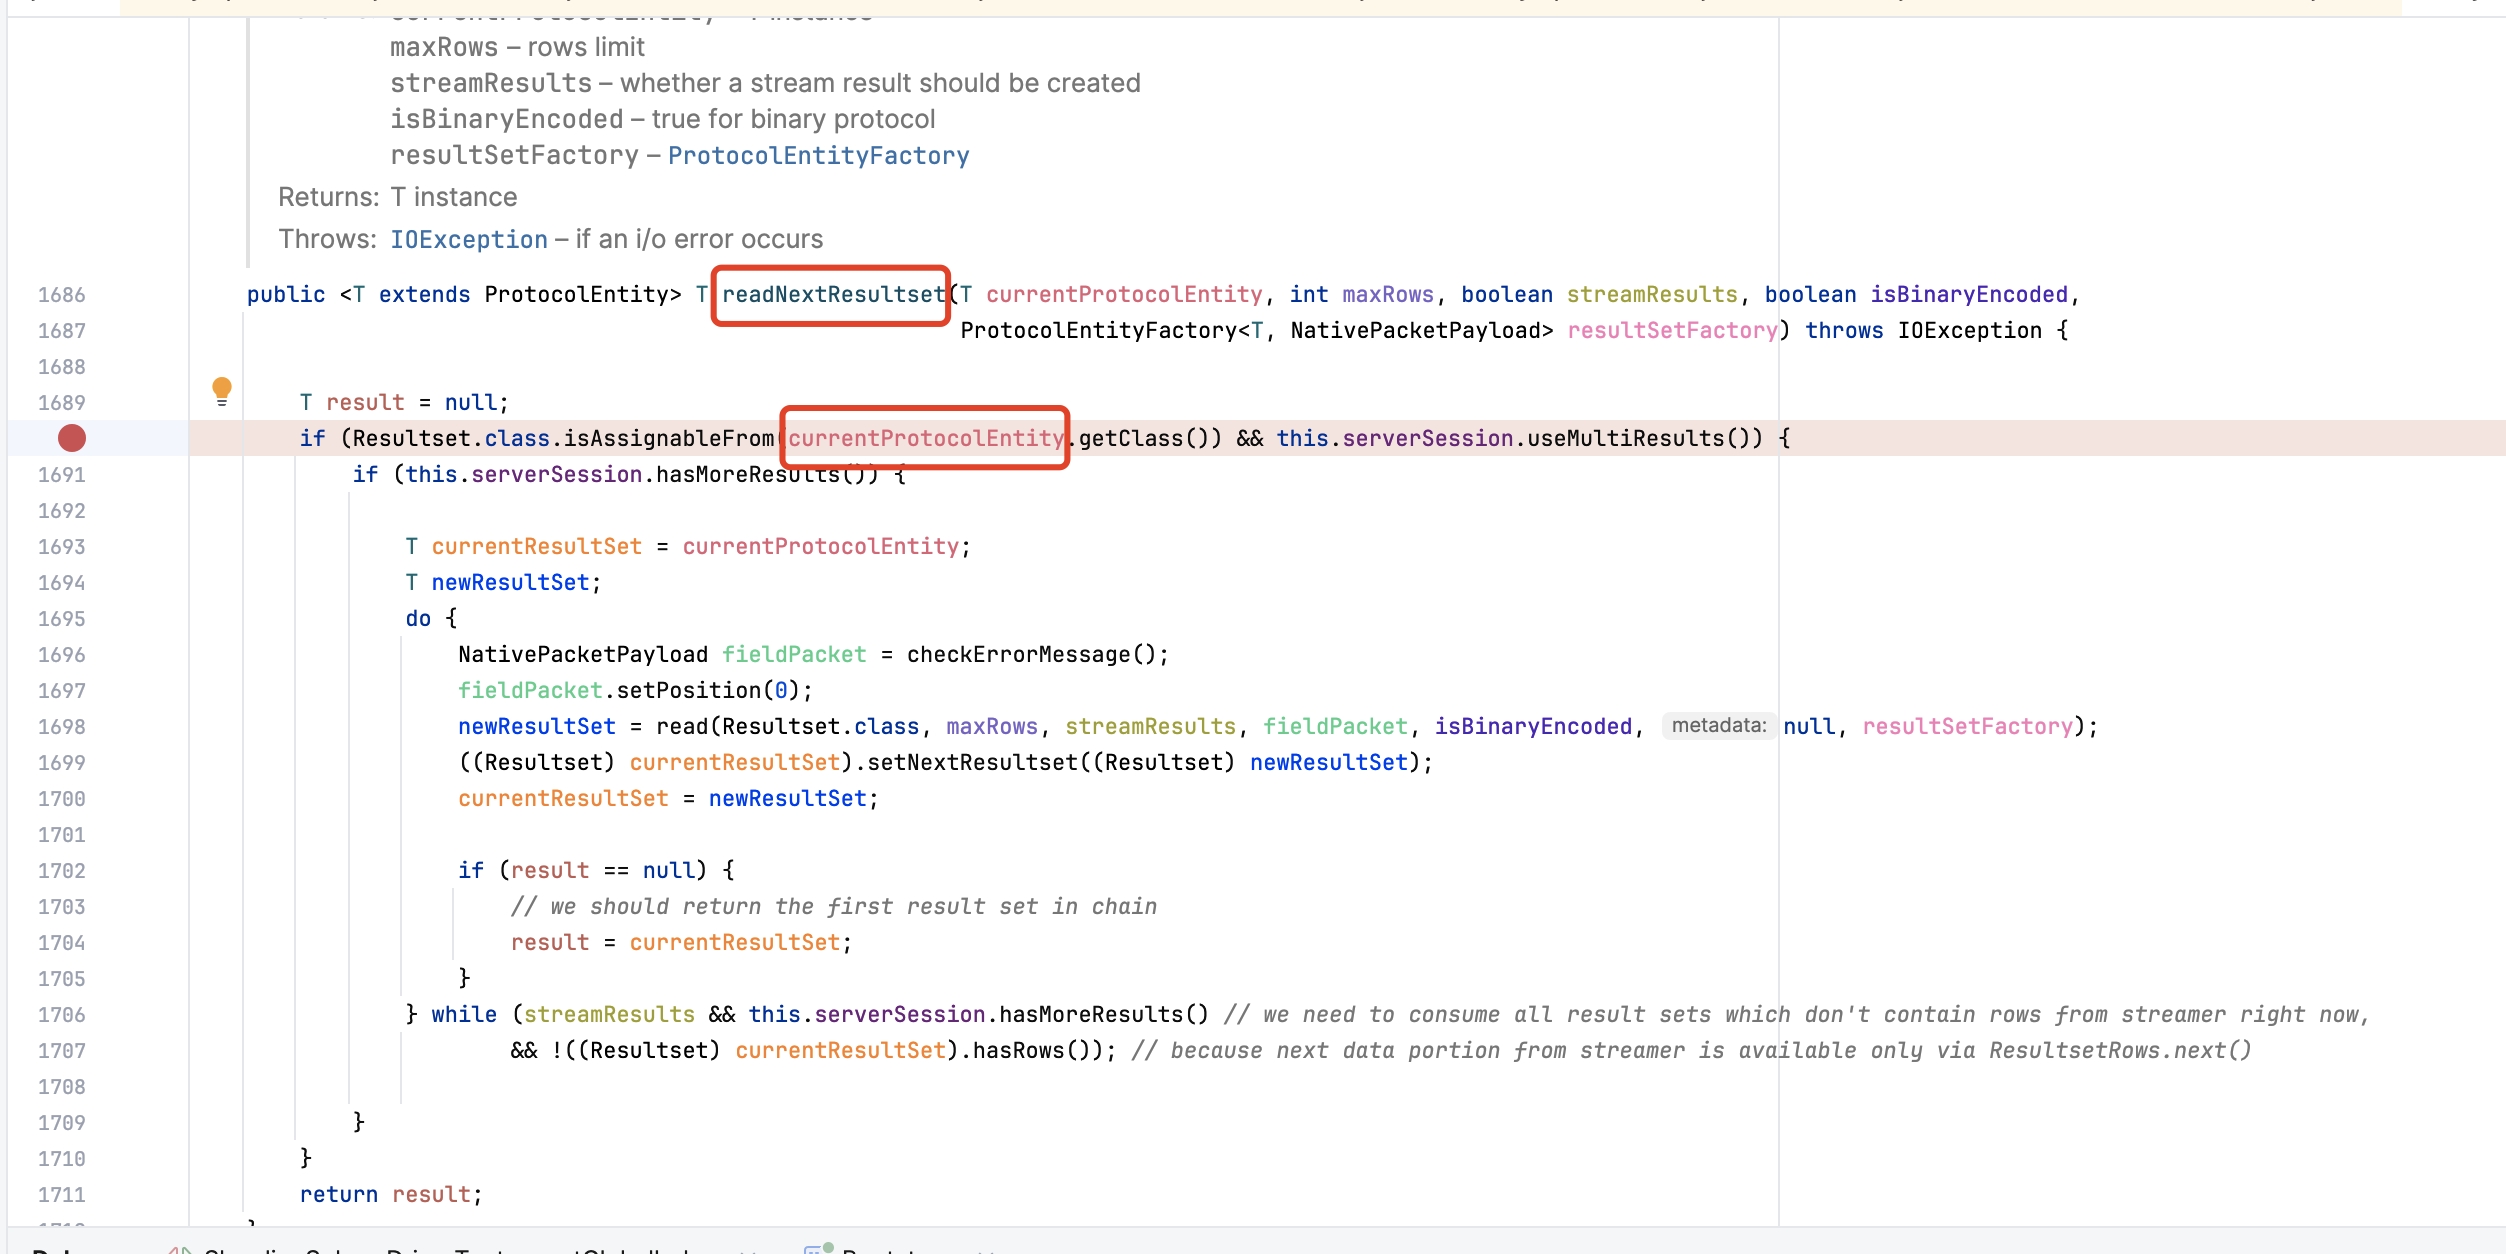
根据出现 NPE 的位置,我们大致可以定位到 NativeProtocol#readNextResultset 方法,通过 Debug 可以发现,在 MySQL 驱动获取下一个结果集时,currentProtocolEntity 为空导致了 NPE。排查 currentProtocolEntity 赋值的地方,发现是 serverSession.useMultiResults() 返回 false,导致 currentProtocolEntity 未赋值,而 useMultiResults 方法的判断逻辑如下,会从 clientParam 标记中获取 CLIENT_MULTI_RESULTS 和 CLIENT_PS_MULTI_RESULTS。
1 2 3 4 5 @Override public boolean useMultiResults () { return (this .clientParam & CLIENT_MULTI_RESULTS) != 0 || (this .clientParam & CLIENT_PS_MULTI_RESULTS) != 0 ; }
可以看到该判断主要依赖 clientParam 变量,NativeAuthenticationProvider 方法会在登录认证通过后,调用 setClientParam 方法初始化该变量,具体代码逻辑位置如下。
1 2 3 4 5 6 7 8 9 10 11 12 13 14 15 16 17 18 19 20 21 22 23 24 25 26 27 28 29 30 31 32 33 34 35 long clientParam = capabilityFlags & NativeServerSession.CLIENT_LONG_PASSWORD | (this .propertySet.getBooleanProperty(PropertyKey.useAffectedRows).getValue() ? 0 : capabilityFlags & NativeServerSession.CLIENT_FOUND_ROWS) | capabilityFlags & NativeServerSession.CLIENT_LONG_FLAG | (this .useConnectWithDb ? capabilityFlags & NativeServerSession.CLIENT_CONNECT_WITH_DB : 0 ) | (this .propertySet.getBooleanProperty(PropertyKey.useCompression).getValue() ? capabilityFlags & NativeServerSession.CLIENT_COMPRESS : 0 ) | (this .propertySet.getBooleanProperty(PropertyKey.allowLoadLocalInfile).getValue() || this .propertySet.getStringProperty(PropertyKey.allowLoadLocalInfileInPath).isExplicitlySet() ? capabilityFlags & NativeServerSession.CLIENT_LOCAL_FILES : 0 ) | capabilityFlags & NativeServerSession.CLIENT_PROTOCOL_41 | (this .propertySet.getBooleanProperty(PropertyKey.interactiveClient).getValue() ? capabilityFlags & NativeServerSession.CLIENT_INTERACTIVE : 0 ) | (this .propertySet.<SslMode>getEnumProperty(PropertyKey.sslMode).getValue() != SslMode.DISABLED ? capabilityFlags & NativeServerSession.CLIENT_SSL : 0 ) | capabilityFlags & NativeServerSession.CLIENT_TRANSACTIONS | NativeServerSession.CLIENT_SECURE_CONNECTION | (this .propertySet.getBooleanProperty(PropertyKey.allowMultiQueries).getValue() ? capabilityFlags & NativeServerSession.CLIENT_MULTI_STATEMENTS : 0 ) | capabilityFlags & NativeServerSession.CLIENT_MULTI_RESULTS | capabilityFlags & NativeServerSession.CLIENT_PS_MULTI_RESULTS | NativeServerSession.CLIENT_PLUGIN_AUTH | (NONE.equals(this .propertySet.getStringProperty(PropertyKey.connectionAttributes).getValue()) ? 0 : capabilityFlags & NativeServerSession.CLIENT_CONNECT_ATTRS) | capabilityFlags & NativeServerSession.CLIENT_PLUGIN_AUTH_LENENC_CLIENT_DATA | (this .propertySet.getBooleanProperty(PropertyKey.disconnectOnExpiredPasswords).getValue() ? 0 : capabilityFlags & NativeServerSession.CLIENT_CAN_HANDLE_EXPIRED_PASSWORD) | (this .propertySet.getBooleanProperty(PropertyKey.trackSessionState).getValue() ? capabilityFlags & NativeServerSession.CLIENT_SESSION_TRACK : 0 ) | capabilityFlags & NativeServerSession.CLIENT_DEPRECATE_EOF | capabilityFlags & NativeServerSession.CLIENT_QUERY_ATTRIBUTES | capabilityFlags & NativeServerSession.CLIENT_MULTI_FACTOR_AUTHENTICATION; sessState.setClientParam(clientParam);
Proxy 端通过 MySQLAuthenticationEngine 处理 MySQL 登录认证,会将握手结果封装在 MySQLHandshakePacket 中,其中包含了 capabilityFlags 服务端能力标志位的信息。
1
2
3
4
5
6
7
8
9
10
11
12
@Override public int handshake (final ChannelHandlerContext context) { int result = ConnectionIdGenerator.getInstance().nextId(); connectionPhase = MySQLConnectionPhase.AUTH_PHASE_FAST_PATH; boolean sslEnabled = ProxySSLContext.getInstance().isSSLEnabled(); if (sslEnabled) { context.pipeline().addFirst(MySQLSSLRequestHandler.class.getSimpleName(), new MySQLSSLRequestHandler ()); } context.writeAndFlush(new MySQLHandshakePacket (result, sslEnabled, authPluginData)); MySQLStatementIdGenerator.getInstance().registerConnection(result); return result; }
参考 MySQL Client/Server Protocol 文档 - Capabilities Flags ,能力标志位共 32 个 bit 位,每个 bit 位代表协议的一个可选功能,客户端和服务端的交集,共同决定了将使用协议的哪些可选部分。
按照功能属于高 16 位,还是低 16 位,需要分别将功能设置到 capabilityFlagsLower 和 capabilityFlagsUpper 中。查看 CLIENT_MULTI_RESULTS 和 CLIENT_PS_MULTI_RESULTS,它们属于高位功能,因此在 calculateHandshakeCapabilityFlagsUpper 方法中增加 Flags 即可 ,如下是具体设置代码。
1 2 3 4 5 6 7 8 9 10 11 12 CLIENT_MULTI_RESULTS(0x00020000 ), CLIENT_PS_MULTI_RESULTS(0x00040000 ), public static int calculateHandshakeCapabilityFlagsUpper () { return calculateCapabilityFlags(CLIENT_MULTI_STATEMENTS, CLIENT_PLUGIN_AUTH, CLIENT_MULTI_RESULTS, CLIENT_PS_MULTI_RESULTS) >> 16 ; }
修改完成后,再次使用 Demo 程序测试,发现已经能够返回正确的结果,通过 JDBC 可以正常执行 addBatch/executeBatch 并返回 int[] 数组。
最后,我们使用全局索引功能 E2E 再次进行测试,原先断言失败的 Case 现在终于可以通过,大家终于可以放心使用商业版全局索引功能。在此,也真心向大家推荐 SphereEx 的 DBPlusEngine,相比开源的 ShardingSphere,它具有更完善的企业级功能,不仅能够进行海量数据的分片管理,还可以用于数据安全加密和数据库替换等场景,更多信息可以查看 SphereEx 官网 。
本文介绍了 E2E 测试 Proxy 发现批量写入返回结果错误后,如何一步步梳理 Proxy 代码,使用 Wireshark 抓包对比分析,以及排查 MySQL 驱动源码,最终完美解决了问题。提升 Proxy 对 MySQL 协议的兼容度,很直接的方法就是同测试用例比对,通过强大的 Wireshark 工具,我们可以很清晰地观测到请求过程中的差异,进而快速找到解决问题的方案。本案例的排查思路也适合其他 Proxy 接入端的问题,希望对大家有用,由于本人对 Wireshark 使用经验有限,如果问题也欢迎指正。
欢迎关注「端小强的博客 」微信公众号,会不定期分享日常学习和工作经验,欢迎大家关注交流。

